This article explains network settings when using OVH/Kimsufi servers
1. Mac id can be generated and found in ovh robot panel .You can give any machine name but mac type should be ovh.
2. If you want to add secondary IPs or add-on IPs to the vps then make sure you assign the same mac id of primary IP of vps to the secondary IP.
3. Adding different mac id to secondary IPs will not work on existing vps.
IPv4
Gateway : IPv4 : It should be same as the server's gateway found in output of route -n command on the server.
(Alternatively) This will be your host/box/node server IP Address, but with the last octet as 254. For example : My host IP is 1.2.3.4, so the gateway will be 1.2.3.254.
Netmask : This will be given by service provider .
Routed : Please check routed option .
Adding ip and mac :Please add ip and mac one by one .

IPv6
Gateway : If your IPv6 is xxxx:xxxx:x:xxxx::1/64, then your Gateway will be – xxxx:xxxx:x:xxFF:FF:FF:FF:FF (viz, same as of your server's ipv6 gateway)
You can even check it in /etc/sysconfig/network-scripts/route6-interface-name file.
Interface-name can be found in ifconfig command output on server.
OR
in /etc/network/interfaces file .
OR
in network configuration file under /etc/netplan/ directory.
You can even find gateway using the steps provided in this guide :
https://docs.ovh.com/gb/en/vps/configuring-ipv6/
Netmask : This will be given by service provider
Routed : Please check routed option

For Openvz 7
To configure IPv6 subnets for OpenVZ 7 containers using the Virtualizor panel with OVH IPv6 addresses, follow these steps:
1. Add an one IPv6 address to your server using the given ipv6 details from OVH provider. Using the follow command you can add the IPv6 on your server.
# service network restart
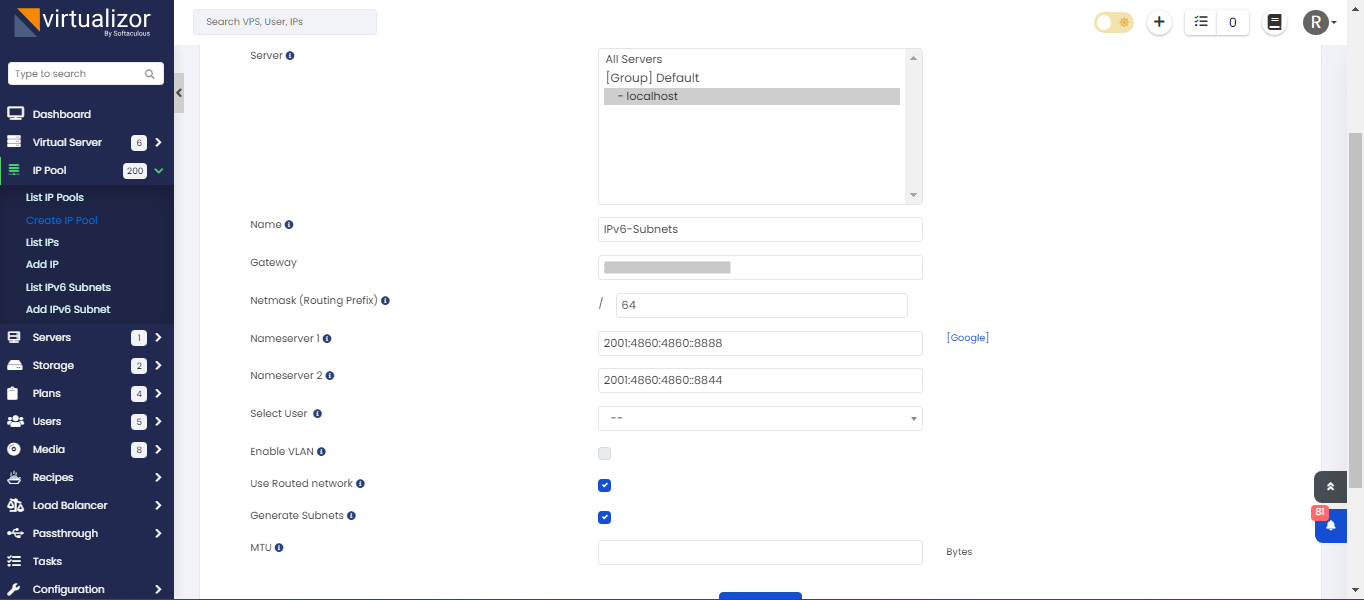
2. Now Create an IPv6 pool from IP Pool -> Create IP Pool -> Select IPv6.
Gateway : Use the same IPv6 address as gateway that you have added on the server.
Netmask : Use the netmask provided by OVH Provider.
Use Routed Network : It should be Enable.
Generate Subnets : To generate the IPv6 subnets please enable this option.

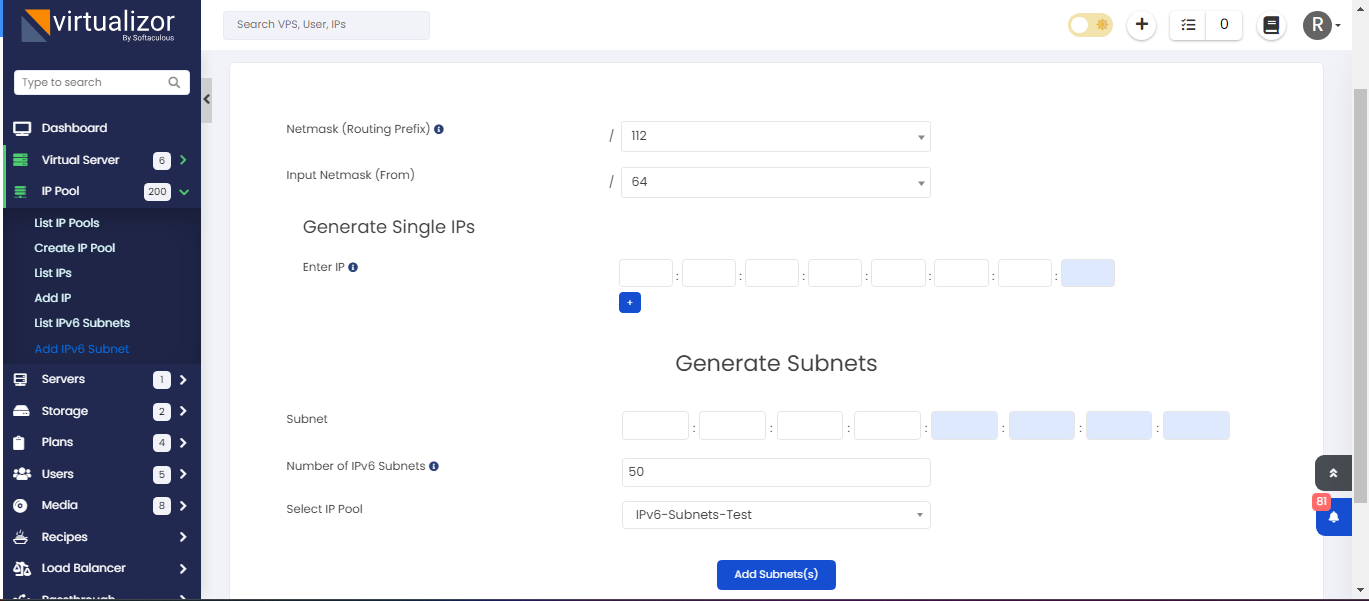
3. Now Please go the page IP Pool -> Add IPv6 Subnet. Fill in the details accordingly and the following is a screenshot of the wizard :

High Grade & SCALE range of servers
When using high-grade/SCALE servers from OVH, they do not provide pre-configured MAC addresses for VPS. Virtualizor will auto-generate MAC addresses if not specified for your VPSes. However, this necessitates the manual addition of static routes on your server's bridge configuration file to ensure proper network connectivity for your VPSes.
IPV4
This guide will use 192.168.178.36/24 as server's range and 10.0.3.0/24 as additional range as an example.
IP pool gateway will be server's IP.
Almalinux OS
To add a permanent route to the Network Manager, you have to navigate to the connection file located at “/etc/NetworkManager/system-connections”.
Edit your existing Bridge config file (example viifbr0.connection) and add a “route1” property in the IPv4 part of the network configuration.
https://www.virtualizor.com/docs/admin/kvm-bridge/#making-the-bridge-permanent
Example file contents for IPV4:
[ipv4]
# Network config will already be there once you use bridge guide
#Following is the route entry which needs to be added.
route1=10.0.3.0/24,192.168.178.36
#the subnet routed via server's IP 192.168.178.36
Ubuntu OS
Netplan is an Ubuntu exclusive, but it can be quite useful if you want to configure your network using a simple YAML file.
To add a permanent route using Netplan, add the following section to your existing “/etc/netplan” configuration file.
https://www.virtualizor.com/docs/admin/kvm-bridge#making-the-bridge-permanent
Example file contents for IPV4: /etc/netplan/<configuration_file>.yaml
routes:
#Following is a dummy entry which would be already present while creating the bridge using the above guide
- on-link: true
to: 0.0.0.0/0
via: 192.168.178.1
#following is the additional subnet route via server's IP which needs to be added
- to: 10.0.3.0/24
via: 192.168.178.1
For the changes to be applied, you will have to execute the “netplan” command with the “apply” argument.
# netplan apply
IPV6
It will require using separate bridge for IPv6.
You will need to configure one IPv6 IP address (provided by OVH) on your server and create a separate bridge.
If it functions, you can then use that IP as a gateway for IP pool on panel.
And there you can generate a subnet according to your needs.
Almalinux OS
Assuming your network interface is eno2 (as seen in nmcli command output) on the server and its
configuration is already made using nmtui/nmcli commands, then you can
use this command to create a bridge
You can also find interface name using nmcli command output :
# nmcli connection add type bridge con-name viifbr1 ifname viifbr1

# nmcli connection modify viifbr1 ipv6.addresses 'your-ipv6-ip/64' ipv6.gateway 'your-ipv6-gateway' ipv6.dns '2001:4860:4860::8888' ipv6.method manual

# nmcli connection modify eno2 master viifbr1

# nmcli connection modify viifbr1 connection.autoconnect-slaves 1

# nmcli connection up viifbr1

# nmcli connection up eno2
Ubuntu OS
Example file contents : /etc/netplan/<configuration_file>.yaml
  bridges:
    viifbr1:
      addresses:
        - "your-ipv6-ip/64"
      interfaces: [ eno2 ]
      gateway6: "your-ipv6-gateway"
      nameservers:
         addresses:
           - 2001:4860:4860::8888
           - 2001:4860:4860::8844
In order for the changes to be applied, you can run
# netplan apply
